Posts

Ventrify Process: Shaping ideas into products

Launching a new product is a daunting task for any entrepreneur – financing, marketing, sales, distribution, customer service – oh and product development. In product development alone there are so many technical disciplines involved, and even more steps.

But the same thing that makes product development daunting is also what makes it so exciting. At Ventrify, we’ve built a process to shape ideas into products that people love – and honestly, even though it’s still a work in progress, we’re proud of it.

There’s a lot of uncertainty to in product development – we know. In fact, we thought it wasn’t that complex to start with, so we did it, and we made mistakes. We learned and overhauled our design process. Then, we did it again and again. And after many iterations, we narrowed in on a process that we believe is the most efficient way to develop custom, new hardgoods and consumer electronics on a budget.

A process that allows flexibility, but also provides structure. One that allows quick iterations, and nimble design changes, while doggedly pushing towards an intentional end-goal.

In today’s article, we’ll talk about:

  1. What type of products our design process is meant for
  2. What types of teams this process is built for
  3. The Ventrify Process
    1. Phase 1: Discover & Ideate
    2. Phase 2: Design & Prototype
    3. Phase 3: Engineer & Design for Manufacture
    4. Phase 4: Production Management and Logistics
  4. What didn’t work: The evolution of our process, what we tried before, and why it didn’t work
    1. Unclear scope (aka scope creep)
    2. Not planning ahead
    3. Planning for every detail
  5. Summary

What types of products our design process in meant for

This article will focus on hardgoods and consumer electronics using relatively established technology and limited resources.

Why hardgoods and consumer electronics products? Well, if you’re building an engine, it’s going to be different. And if you’re building a boiler, it’ll be different too. We’re talking about products you’d find in Best Buy or a Home Depot. That’s where the majority of our experience lies, so that’s what we’ll be focusing on in this article.

Now, what does relatively established technology mean? Well, if your PHD thesis is on a breakthrough physics phenomenon, you will have to spend a lot more time on R&D (research and development) than a new electric skateboard or air purifier. We’ll focus on the latter.

What types of teams this process is built for

We’ll also preface our article with a note on resources: we’ve built this process for a small team working on a budget. This is meant for entrepreneurs and startups, not companies with 100+ employees and a $10M budget.

That being said, this is a multi-disciplined journey. Unless you have at least 1 person on your team that is dedicated to only product development, we don’t suggest you try this on your own. Our development team has 1 industrial designer who doubles as a project manager, 1 mechanical engineer, 1 electrical engineer, and 1 sourcing manager that all act as one team.

One team could accommodate 2 more mechanical engineers and 2 more electrical engineers depending on the types of projects. For startups that don’t have 1 client like we do, but are going to market themselves, we recommend having a product manager on the team.

Note that our team doesn’t include software expertise. We’ve found software to be an extremely broad domain on its own and have found better success in partnering up with software-dedicated teams on projects, so our process does not include the software development.

Working with the Right Framework: The Ventrify Design Process

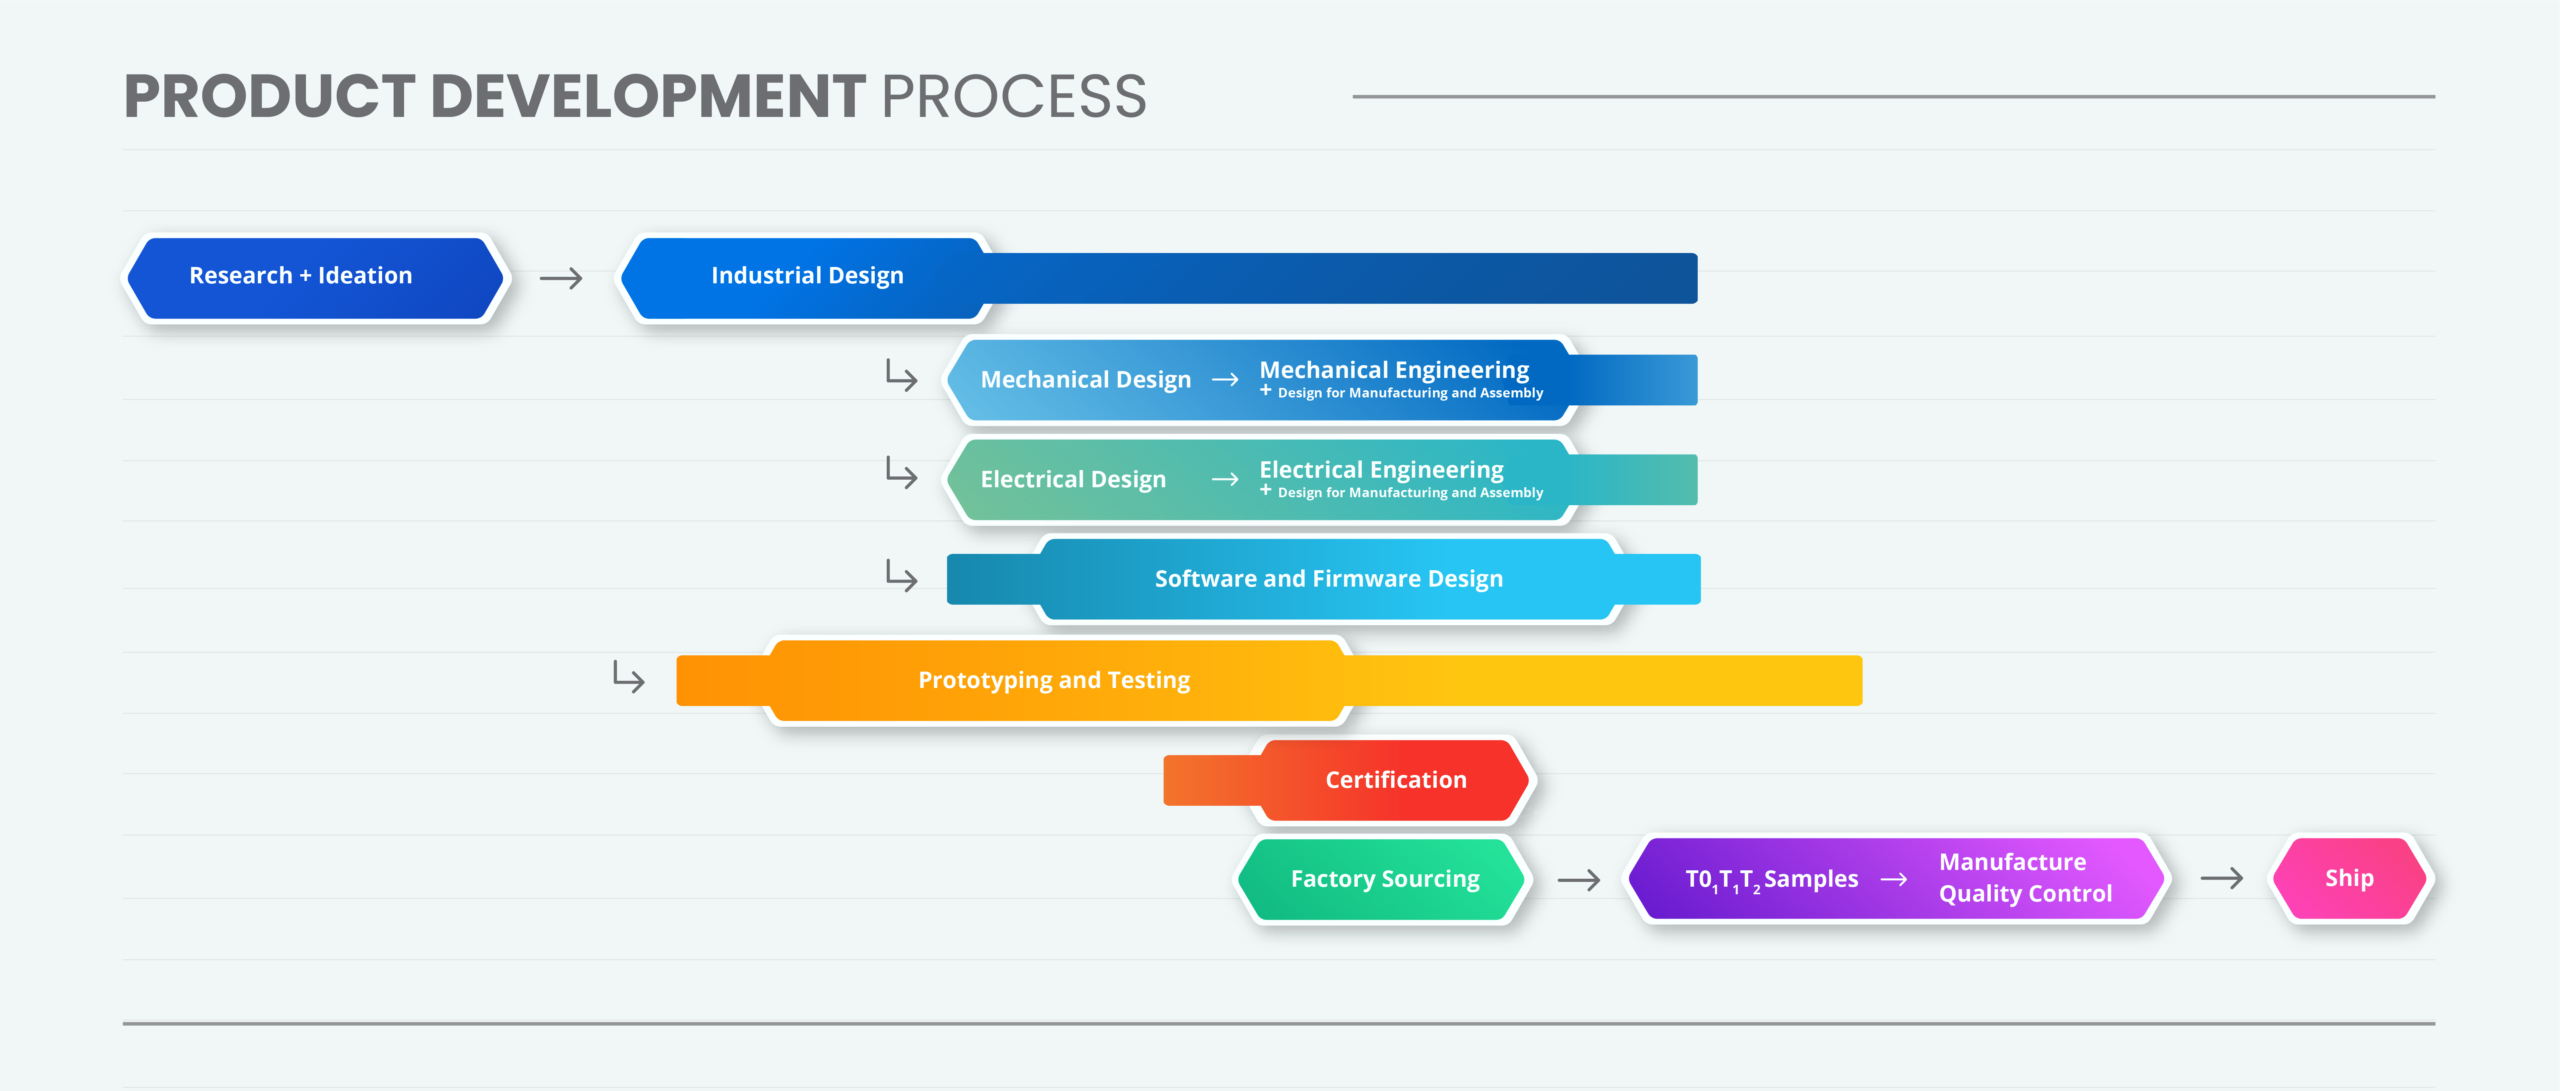
This is the process we have optimized at Ventrify over the last four years to bring concepts from idea to fulfillment ready product.

Phase 1: Discover and Ideate

In this stage, we understand the problem, ideate solutions and visualize them through industrial design sketches. Then we wrap them up by creating a product requirement document. This establishes the base on which the whole product is built. Phase 1 consists of 3 parts:

Understanding the end-user, their problem, and the greater market need.

You have to know your end users intimately. This is the person who uses your product for its intended purpose.

  • What are they doing?
  • Where are they doing it?
  • What do they value and what are they frustrated about?
  • What alternative solutions do they currently have?

We’ve found answering these questions, helps with answering many design questions later on.

Ideating solutions and visualizing with sketches

After doing the research and understanding the context, the whole Ventrify team comes together to discuss and ideate solutions to the problem. If there is an original concept, this is the time to consider it and evaluate it against alternatives – the good, the bad, its appeal, and how to make it better.

Then, we take the best ideas and combine them into a final product concept that we will bring to life through industrial design sketches or renders.

Building a product requirement document

With thorough research and a clear product concept, you can now effectively define success in measurable ways. We translate our research and visuals into measurable targets. These product requirements allow us to estimate the time and cost required for the remainder of the project.

The parameters defined, and not defined, are based on what is important to the end user and the client. Defining these requirements is key to overcoming a common pitfall of design – scope creep (more on that later).

As the product’s founder and head cheerleader, you will be tempted to add features as the development progresses. By putting together a product requirement document, you can focus on intentional defining success at the start, and prevent endless design changes.

Remember, the first version of a product will always have room for improvement. This is what future product versions are for. Having these parameters in place at this stage will help move the design forward and drastically decrease timelines.

Doing a thorough Phase 1 has a disproportionate influence on the product design cycle. Changes in later stages require significant rework, so doing this first phase well is how we’ve cut our design timelines by as much as 50%.

Phase 2: Design and Prototype

Phase 2 is all about making sure it will work – design, built, test, repeat. Let’s look at these 3 parts:

Conceptual design: analyzing & solving key design challenges.

Here, we define key design elements and address challenges individually prior to integrating them into the full design. We do this with complex mechanical systems, breaking them into smaller, more manageable sub-systems. If your product has electronic requirements, we break them down the same way.

By breaking them down into smaller sub-systems, the design challenges become more approachable and less daunting. This also makes it a lot easier to estimate the time needed to address each challenge.

Prototyping the mechanical and electronic systems.

At this stage, we translate the design into mechanical and electrical systems. We model these systems using appropriate design tools, then plan, source, and build prototypes.

Depending on the prototype, we often defer to 3D printing because it is so flexible. Quick note on 3D printers: although having a 3D printer is very affordable and it is extremely versatile, misbehaving printers can waste a lot of time, do your research before deciding to do this in-house.

For electronics, we build out the design with a breadboard or a raspberry pie to make sure it works before moving to something more compact and custom like a pcb (printed circuit board). If your product needs software to run, this can get complex quite quickly and software has its own development cycles. For this stage in prototype testing, we simply build a sample interface using a tool like Figma.

There are 2 types of prototypes, functional and aesthetics. Functional prototypes will do the intended function but maybe a different shape, size or look.  Aesthetic prototypes will look and feel like the product but won’t function properly or at all. Learn the ins and outs of prototypes at our blog, Prototyping in New Product Development Today.

Testing & Iterating

We test early prototypes quickly, iterating on changes as necessary and test them against key defined requirements from the product requirement document.

Most testing at the beginning can be done internally with the testing team or with friends and family. Since you’ve defined what your end users need, explain it to your testing team for context. Later on with higher fidelity prototypes, it is ideal to test with your end user.

When testing, watch how your product and its features are understood and used. Try not to make assumptions – instead, ask lots of questions, and try to understand the “why” behind what happens. Recordings help for later reference but be sure to ask permission.

If your prototype isn’t fully functional or the different parts of the system are not yet integrated, describe to them what would happen if they touch a button or pull a lever. Walk them through the functionality and try to get as much insight as possible.

Phase 2 is iterative within itself. This means the results in testing need to define the updates in the conceptual analysis, and the new prototypes should address previous issues.

Starting conceptual will help to iterate fast and not spend too much time on something that may not work. However, iterating fast allows you to narrow in on what works and get more detailed in addressing challenges and design concepts. Phase 2 is heavily influenced by the type of product you are working on, the systems in place, and the project requirements.

You know you’re ready to move to Phase 3 when all design features of the product have been set.

Phase 3: Engineer & Design for Manufacture

Phase 3 is all about getting the design production ready. This entails choosing a factory so that the manufacturing details can be determined.

Design for Manufacture and Assembly (DFMA)

This is the Design for Manufacturing Assembly (or DFMA) stage. Here we revisit the electronic and mechanical systems to optimize them for ease of manufacture, cost, reliability, and other product priorities. This means choosing the best manufacturing processes for your components and optimizing for that design process.

Once you have chosen a factory (you should have at this point), you should also work with them to accommodate their requirements as well as work with their in-house experts to implement any suggestions they may have (engineers at factories are often very specialized as they work in 1 environment for a long time and will have invaluable advice in that realm).

This step is also where you build your drawing package, export CAD files for the factory, and provide renders.

Manufacture Preparation

As you prepare to ship your product to do final testing and certification, it’s time to focus on the support material – product packaging and documentation packages.

For product packaging, consult with marketing as the “first impression” and “unboxing experience” can be very important but will depend on your market positioning and your distribution strategy.

Instruction manuals don’t always seem necessary, but can go a long way when limiting liability, targeting a less intuitive audience, and reducing the number of customer support emails you get. Remember, this doesn’t necessarily have to be printed, but make it visible and easily accessible.

Testing (and Certification if necessary)

Although calculations are great, you still need to make sure that the final product will withstand the theoretical design conditions.

This testing usually happens in highly controlled environments to ensure the design conditions are met. This can be done instead of, or in preparation for, certification. Certification is done by a variety of third-party labs and should be contacted early to gauge time and cost associated.

Learn more about the types of certifications your product may need at our blog, What Certifications are Needed for My Product?

Phase 3 also changes significantly based on the type of product and the requirements we have set out.

Phase 4: Production Management & Logistics

When you are done with Phase 3, you are ready to oversee production, ensure quality control, and manage the logistics.

Bonus: Find the best factory for your product needs

(Although this should be done during Phase 3, it fits better in this category).

Finding a factory involves searching and qualifying the best factories for your needs. There is no overall best factory, but there is one that is best suited for your project. Remember, your project will have specific priorities, whether it’s cost, quality, or time.  Also, the factory you choose should fit your order size (unit quantity) and allow for future growth.

Ideally, you want a factory that has created similar products – one that uses similar materials, similar processes and is of similar complexity. This allows you to gauge the quality of the work that the factory does and allows them to use their valuable experience for your project.

When searching for a manufacturing partner, consider talking to at least 20 different factories & narrow down to the best 2-3. The initial number of factories you will need to reach out to will be high because of the low response rate, so more is better to start.

At Ventrify, we look for factories all across the world. For high-volume manufacturing, China Vietnam, and Taiwan are the leaders. But with China’s strict Covid-19 restrictions and the rising cost of shipping, North American factories are getting more and more attractive. Again, everything comes down to your project priorities.

Walking through the factory prior to making the final decision will allow you to see typical working conditions. It is important to know that your product is coming from a safe and respectable working environment. We always have someone from our team visit the factory – it helps build trust with the factory and works as the basis of a strong relationship.

Overseeing production and ensuring quality control

During your manufacturing run, it is critical to have third-party quality control set up to ensure that any detailed requirements are carried out.

Most experienced factories will offer in-house quality control but there is no real incentive for them to find and address these issues (especially if it your first time working with them). Unfortunately, they can often overlook quality control issues. It is best to use them in addition to a third-party dedicated contractor.

Mismanaging production and quality control can mean wasting all the hard work you dedicated to the design, so don’t let your guard down just yet.

Logistics

Logistics refers to managing the vendor contracts, timelines, and payment for trucking from factory to port, export management, shipping (or air freight), import management, trucking from port to train station, train transport, and trucking from train to fulfillment center.

Because there are so many moving parts that need to be coordinated perfectly, we often work with a specialty logistics company to make sure this process goes as smoothly as possible.

As we come off the back-end off the Covid-19 pandemic, there are many horror stories surrounding supply chain management. As a result, there has been a big push to onshore production, but this move is highly dependent on the industry you are in and the product you are making. We recommend you do your own research on this topic before starting as it is constantly changing landscape.

That’s our process in a nutshell!

There is, of course, a lot that changes depending on the type of product, the complexity, and the requirements of every specific project. But before you dive into developing your own product, read about our biggest stumbling blocks from the early days:

What didn’t work: the evolution of our process, what we tried before and why it didn’t work (our mistakes)

Staying aware of these before starting the project will help you avoid expensive mistakes and long delays.

Unclear Scope (aka scope creep)

Scope creep is a common beast.

Whether it’s out of excitement, a desire to make your product better, a bit of perfectionism, or just a lot of feedback you want to implement, there are always reasons and opportunities to increase the scope of a project.


Sometimes, it is warranted, but often, an unclear scope leads to scope creep. Having a well defined scope (read: have a good product requirement document) can go a long way to keeping you on track. This plays a huge factor in both time and cost.

Not Planning Ahead

It sounds silly now, but in our early years of product design, we split every part of the product design process into each own step (9 steps at one point) and did them consecutively. That didn’t work for many reasons, but one of the consequences was that it was easy to focus on work at hand.


We justified it by saying it would improve focus, decrease task switching, and result in more progress. But it only took one time signing up for a certification lab and being put into a 3 month que before we changed that.

Plan ahead.

Planning for every detail

After not planning enough, we over-corrected and began to forecast the whole project from the start. It was part of an initiative to help with quoting lump sum projects.

But the nature of the design process is it is unpredictable. Change happens. Testing never goes as planned. There is almost no way to forecast how many design iterations you will end up doing. You have to stay nimble.


We’ve found that a product requirement document strikes a strong balance – it helps define the end goal, but allows us to be flexible in getting there. We’ve also moved away from lump sum projects for this reason.

Summary

Product development is broad and complex, but for hardgoods and consumer electronics built on a budget, the Ventrify Design Process is a guide to an efficient and methodical product launch.

Trust the process, avoid our mistakes, and make something great. Good luck!

If you enjoyed this article, you might also enjoy our other insights: https://ventrify.ca/blog/

About the Author

Ventrify is a product design and manufacturing firm that helps entrepreneurs bring product ideas from concept to market. We take in fledgling ideas and bring them through our iterative design process to create products our clients can be proud of. Then, we work with manufacturing facilities worldwide to bring our clients the highest quality products at competitive prices.

If you have questions about the Ventrify Design Process or need help with your product design, reach out to us through our Website, Facebook, or LinkedIn.

Prototyping is a sexy word that gets thrown around a lot in product development circles, so what is it and what’s the big deal? Well, the topic of product development is broad, and so is prototyping. In fact, prototyping is a part of almost every aspect of the product development process in one way or another. 

At different stages of the product development process, there are different types… of prototypes. They are used for a variety of reasons, but generally, they are made to test some aspect of your design.

Here’s what we’ll cover in our discussion about prototypes today:

Let’s dive in! 

And keep in mind – some aspects of our discussion may be relevant to software and commercial applications, but this article is focused on prototyping in the consumer product space.

What is a prototype?

A prototype is an early version of a product built to test some aspect of the design. They are often incomplete in some way, sometimes more and sometimes less expensive than the end-product, may not function, can be a different shape and size, or be down right different. 

Ultimately, prototyping brings a concept idea to reality, it provides a window to study a certain aspect of the theoretical design, in real life.

“Design” is a very broad subject – what part of “design” you ask? Well, for different aspects of design, prototypes do different things, and that’s what we’ll look into next. 

What is the purpose of a prototype?


So now we know that the purpose of a prototype is to evaluate some aspect of a design. That’s very generic – yes – that’s because it is a broad category. Throughout the product development process, prototypes are used for different purposes. Let’s look at a few different reasons for creating a prototype:

Proof of Concept

A proof of concept prototype provides proof that a design, or a specific part of a design, is feasible. It’s often easy to come up with an idea or mechanism, but working out the functionality is often a lot harder. 

A proof of concept de-risks the product development process by addressing the most (or one of the most) challenging parts of the design early. It uses the assumption, if the hardest part can be proven, the rest can be figured out down the line. 

For highly technical products, proving a concept is a huge milestone and one that outside investors love to see (at the pre-seed or seed stage).

Idea Visualization or Communication

Sometimes, the purpose of a prototype is to effectively convey your idea to someone. The  prototype translates a concept into something tangible, something unmistakable. Clients, managers, and team members can obtain clarity on the subject with a prototype.

In some cases, industrial design sketches or 3D models can help visualize a message, but often, a prototype is needed. In the automotive industry, new car designs are formed from clay to help communicate the shape, size, and features of the car. Models and sketches simply cannot convey the design. 

This category of prototypes will likely see a decrease in prominence with the improvement and  adoption of virtual and augmented reality.

Discover product opportunities

Testing your prototypes also helps you discover features that your target audiences love and care about. Often done earlier on in the product development process, testers will help pinpoint the most important features of a product, helping you prioritize your product design efforts.

Asking testers about features they would want also gives valuable insights into what features your target market may like, which can lead to additional features, another version of your product, or even a pivot (changing the main product significantly to address a different opportunity).

Design review & feedback throughout development

In the past prototypes were expensive and, as such, were invested in during later stages of product development. Now, with additive manufacturing technologies (like 3d printing) as cheap and versatile as they are, prototypes have been integrated into the earliest stages of design. 

These prototypes allow you to bring the theoretical concept to reality, which allows you to gather feedback, refine goals, and make decisions.

At early stages, this can mean testing something as simple as the size, shape, or weight of your concept. At later stages, this can mean testing assembly fit and interference, mechanical requirements, or color and texture finishes.

Reduce risk in the product launch 

Testing a prototype helps you identify parts of your product that customers love, and parts of your product that customers don’t understand, dislike, or don’t feel strongly about.

This allows you to focus on the best parts of the design, address issues and remove unnecessary features. Ultimately, this allows you to build confidence in the product and de-risk the final product launch.

Functional Prototypes vs Aesthetic Prototypes


Prototypes are often characterized as functional or aesthetic. Sometimes a prototype is both, but that is typically very late into the product development process (such as the marketing samples, or the golden sample – the standard used for the production runs). Throughout the product development process, the functionality is (typically) addressed separately from the aesthetics. 

Functional Prototypes

A functional prototype is a sample of the full or a part of the product that functions as the design is intended to. Because these prototypes are used to verify functionality, they do not focus on aesthetics and usually won’t look like the final version (shape, size, color, UI, etc). 

Functional prototypes are usually low fidelity in the early stages of development (proof of concept) and high fidelity towards the later stages (for engineering analysis, certification, etc). Up until the later stages of development, functional prototypes use low-volume, easy-to-configure components that will simulate the functionality of the end product, but at a much higher cost and larger form factor.

Functional prototypes help de-risk the product and are instrumental in having confidence in the product functionality.

Aesthetic Prototypes

In today’s competitive markets, products nowadays need to be more than just functional. It is now crucial that your product also evokes a positive response from your customers. 

The goal of an aesthetic prototype is to provide you with a physical sample of how the product will look and feel. This is addressed by the industrial design of a product – which focuses on the human-product interaction. 

Aesthetic prototypes are usually prioritized later on in the development process once functionality is addressed, this means they are often higher fidelity. Note, the opposite is true for brands that prioritize design – they focus on aesthetics first, then address functionality later. 

The development of an aesthetic prototype puts an emphasis on the look, feel, and styling of your product. This means size and shape, but also colors, textures, curvatures, firmness, materials, and more.

Low Fidelity vs High Fidelity Prototypes


Fidelity of a prototype refers to the grade of the quality and is typically dependent on a product’s progress in the development process. 

Low fidelity prototypes

At the earlier stages, products are typically low fidelity and relatively cheap (think $10-$1000). 

Low-fidelity prototypes are common during conceptual design, like a proof of concept, and to help convey ideas and functionality.

This type of prototype helps to make changes easily and quickly. It focuses more on functionality  and allows designers to get feedback early in the design process. 

As the product gets closer and closer to market readiness, the resulting prototypes will have higher and higher fidelity – and will increase in cost accordingly. 

High fidelity prototypes

High-fidelity prototypes start to look like the end-product and are often made at the factory where the production will later take place. 

These prototypes are often used to help decide on the finer details of a design. Because they are often very similar to the end product, they are also used for product certification, gathering testimonials, and creating marketing collateral (professional photography, videography etc.).

In summary: prototype early, prototype often

Successful products do not happen by accident. They are a result of a rigorous design process, which includes the building and testing of prototypes. Remember, prototypes are part of an iterative design process and are meant for testing and learning, so use them early and use them often.

If you have enjoyed this article, check out our insights on testing: Your Complete Guide to Product Testing.

About the Author

Ventrify is a product design and manufacturing firm that helps entrepreneurs bring product ideas from concept to market. We take in fledgling ideas and bring them through our iterative design process to create products our clients can be proud of. Then, we work with manufacturing facilities worldwide to bring our clients the highest quality products at competitive prices.

If you have questions about prototyping in the product development process or need help with your prototype, reach out to us through our Website, Facebook, or LinkedIn.
It happened – you had a light bulb moment – a product idea you know will be big – but how much will it cost to develop? The truth is, it depends on so many factors, it’s hard to say. But in this blog, we will look at the costs associated with developing a specific type of product – a physical, consumer product, made for mass production.

Although this is still an extremely broad category, we will take a look at the typical costs of each step in the product development process. We will dive into what determines the cost and why it varies depending on the type of product. Broadly speaking, the cost of product development will be from $60,000 to $175,000 and that can swing both high and low depending on who you hire, what you do yourself, the complexity of the project, and countless of other considerations.

Why so much? Well, there’s more to product development than meets the eye, and that’s what we’ll dig into today.

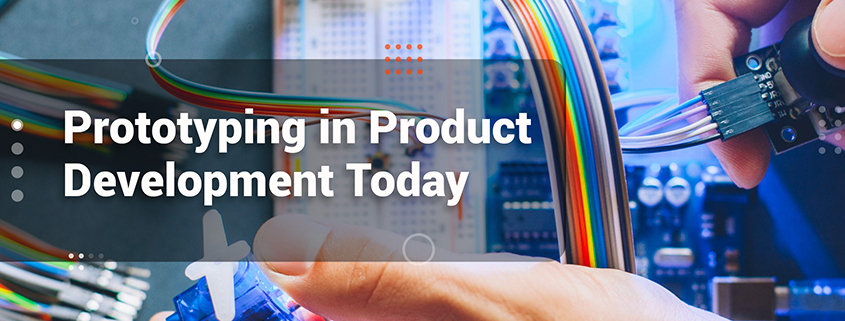
Ventrify product development process

Let’s explore each of these potential costs and the factors that influence each cost:


There are also many soft costs, like finding and qualifying contractors, managing communications, timeline delays, etc., but today, we will focus on the more concrete aspects of the product development process. 

Let’s dive in:

Why it’s important to understand product development costs before jumping in

There are many steps to the product development process, and each costs money – but not every step applies to every product in the same way. 

Whether this is your first venture to creating a new product for the market, or you are a serial creator that has launched several products, knowing how much it would cost to develop your product is vital. 

If you start blind, you may run out of funding before your product ever launches, disappoint investors, or show your naivety to strategic partners. In this article, we hope to give you insight into the process so you can start from a place of knowledge.

The Cost of Research and Ideation

[Cost: $2,500 – $5,000]

In planning to launch a new product, the first step is to understand the problem, and how you solve that problem. You want to see how big the problem really is and the greater market opportunity. There are many ways to do this, but the goal is to come up with a product concept with functional elements that serve as a foundation for product development. 

With Research, a holistic and objective perspective of the problem is reached. This is often necessary because the founder of a business is intimately attached to the problem, and doesn’t always experience the problem the same way as everyone else. Although the founder is the one to finds the problem and often the solution, the product design process requires you understand these 2 things objectively so that they can be built not for the founder, but for the greater market need. 

A product requirement document is often built at this stage to define what, exactly, is needed to define success. This works to mitigate scope creep throughout the design process.

Ideation (or idea formation) is the creative process of coming up with of potential ideas and solutions to the problems. There are many ways to go through this process, but generally, the outcome is a set of potential solutions to the problem or problems presented. The solutions can address a specific problem or all the problems. The chosen design is often some combination of multiple ideas. 

What Determines the Cost of Research and Ideation?

It is very difficult to narrow down Research and Ideation as it is highly variable for different products. A few items that affect this range are:

  • complexity of problem and solution
  • background knowledge on the subject area
  • what level of detail you are looking for

The Cost of Industrial Design

[Estimate: $2,500 – $10,000]

Industrial Design addresses how the product will look and feel in the product-human interaction, which determines who this product will sell to on the market. 

Industrial Design considers every aspect of the product from appearance to functionality with the goal of creating a design that resonates with the customer and is intuitive to use. If you have ever picked up a product and it simply “made sense,” without reading the instructions, that is good industrial design.

This work is front heavy with sketching and modeling the product concept – “bringing the concept to life.” However, industrial design is important throughout the whole development process to ensure the design does not change or deviate heavily from the original solution. This is often a challenge during the later stages of development as the initial design must adapt to the functionality, reliability, and manufacturability of the engineering and production stages.

What Determines the Cost of Industrial Design?

This depends on how important design is for your product – many products will focus on function, while others will look to distinguish themselves through market positioning. Sometimes, you can adopt an existing product design that works just fine, but for novel products, this is often not the case. Considerations for this cost will include:

  • the importance and value you put on the industrial design
  • complexity of product
  • number of use cases you are considering for the product
  • whether designers and founder align on design and vision

The Cost of Technical Design

[Estimate: $15,000 – $30,000]

Technical design breaks down the ideas in the industrial design stage into feasible mechanical, electronic, and software systems. These systems are created using low volume, prototype-style design tools as a proof of concept. These designs are then iterated on to solve subsequent design challenges.

The purpose of this step is to make sure the functionality (or the aesthetic) of a product concept is feasible. 

The technical design step happens in cycles with prototyping and testing. Systems are designed, prototyped, and tested. These cycles are repeated to address and overcome design challenges as well as roadblocks that come up throughout the design process.

Technical Design Cost Factors

Depending on the nature of the product, this stage can be extensive or relatively short. Complex projects will require many design iterations, while some products may be purely mechanical and can completely skip the electrical and firmware/software side of things.

It is difficult to estimate the time and cost associated with this stage and it is iterative and new challenges will often arise throughout the design process.

The Cost of Prototyping

[Estimate: $5,000 – $10,000]

Prototyping is about building a design so it can be tested. 

Early on, this happens as part of the technical design cycle (design, prototype, test) where you are able to validate feasibility and address big risks. Later on, this happens as part of the engineering design cycle (engineer, prototype, test) where you validate engineering analysis, reliability concerns, and other more nuanced aspects of the design.

With the emergency of additive manufacturing (mainly 3d printers), prototyping has moved into earlier and earlier stages of the product development process, getting cheaper and cheaper. Learn more in our article, Prototyping in Product Development Today.

Factors Affecting Prototyping Costs

Prototyping starts at the early stages and ends in the late stages of the development process. It can be very cheap and quick for low fidelity functional prototypes and very expensive for high fidelity functional and aesthetic prototypes.

In general costs are also affected by

  • Complexity of the prototype (number of parts, tolerances, mechanical integrity, etc.)
  • Fidelity of the prototype
  • Method of manufacture, materials, etc.

The Cost of Testing

[Estimate: $5,000 – $10,000]

Testing happens throughout the product development process. It happens in conjunction with prototyping as part of the design iterations. 

Testing allows the design team to gather feedback on your designs. It helps the team to identify potential issues or validate product decisions. Testing also allows you to de-risk the product launch: by testing throughout the development of the product, the design team has constant feedback on what works and what doesn’t. 

Product requirements should be clearly defined at this stage so that a prototype may be effectively evaluated on whether its performance is acceptable or not. Learn more in our article, Your Complete Guide to Product Testing.

Factors Affecting Testing Costs

Product testing costs vary depending on the product concept being tested:

  • Riskier projects may require more testing and iterations to improve confidence and reduce risk
  • If multiple product concepts are to be pursued, this will mean testing multiple concepts in parallel
  • The less uncertainty you are willing to put up within the product testing outcomes, the more thorough your testing needs to be and the more it will cost
  • Specific tests will require specific equipment

The Cost of Engineering

[Estimate: $25,000 – $50,000]

As the product goes through more and more detailed testing and refinements, engineering analysis is done to prepare for reliability, production, and regulatory requirements.  Mechanical, electrical, software and firmware systems are optimized for cost, durability, efficiency, and other product requirements.

The focus at this stage is on getting the product design ready for mass production. 

The product design is engineered to meet the initial specifications. Design requirements are reviewed, and analysis performed. Testing is carried out to validate calculations and ensure certification testing will succeed.

A lot of finer details are taken care of at this stage such as creating the quality control requirements, building the instruction manuals, and setting up for certification.

Cost Factors Affecting Product Engineering

  • Number of parts and assemblies
  • Safety devices, medical devices, 
  • High intensity environmental conditions
  • Electrical and firmware/software systems
  • External device integration
  • Rare or complex materials and manufacturing processes
  • High performance equipment
  • Products requiring electrical hardware and software/firmware integration may cost more to create than the simpler ones

The Cost of Certification

[Estimate: $5,000 – $10,000]

Once the product prototype passes through internal testing to ensure that it is safe, reliable, and can meet its desired product specifications, it then needs to go through 3rd party product testing for certification, before it can proceed to mass production.

Product certification cost and timeframe is based on which certifications you choose to get and where you choose to get them.

Product certification is the process by which your product is tested to meet regulatory standards in a specific market or industry. For example, if you were selling a medical device, a safety device, or a wireless device, you would need to certify your product before selling it to consumers.

Types of product certifications can include:

  • FCC certification, for all electrical products sold in the United States, although this certification is significantly more expensive for wireless products.
  • UL certification or CSA certification, for any electrical product sold in the United States and/or Canada that plugs into an electrical outlet.
  • CE certification, for most electronics sold in the European Union. This certification is like the FCC and UL certifications required in the United States.
  • RoHS certification ensures that the product is free of lead and is required for products sold in the European Union or California.

Learn more about what certifications you need for your product at our blog: What Certifications are Needed for My product.

The Cost of Factory Sourcing and Set-up

[Estimate: $2,500 – $50,000]

Setting up for mass production can be a significant expense when developing a new product. This stage includes finding and qualifying the best manufacturing partner(s) for your product. Then, negotiating contracts (costs, timelines, quality control procedures, etc.)  and setting up the production tooling.

After the final engineering design is complete, the final prototype (sometimes called the Golden Prototype) for production is prepared. The final drawing packages as well as this golden prototype will be used to set up production tooling and run t0, t1, and t2 samples. These samples are the first units created by the mass production tooling and allow you to refine how the end product will turn out. 

Factors Affecting the Cost of Factory Sourcing and Set-up

There’s a lot that can define the cost of this step. 

  • The manufacturing process used (plastic molds are often the big cost at this stage)
  • The complexity of your product and whether you will need to coordinate multiple factories or just one
  • How specific you are with cost
  • The production run quantities you will be making (and minimum order quantities)
  • If the factory has made a similar product or if they have similar capabilities (vs making tooling from scratch)
  • Manufacturing process used (is it manual, highly automated, how long it takes, etc.)
  • Availability of materials 

Learn more in our related articles, A Beginner’s Guide to Incoterms and The Price of Mass Producing Plastic Products.

The Cost of Manufacturing Quality Control

[Estimate: 0.5-2% of production cost. Often about $500 – $1,000 on a first order.]

Ensuring the quality of the product is absolutely essential. Quality control happens throughout the manufacturing process at the component level, the assembly level, and the final package level. 

In the engineering stage, you will have identified a number of likely issues that need to be monitored in a quality defect document. You will work with the factory to roll out quality control checks throughout production line; however, it is important to also have a third party quality control partner to ensure this is done properly.

By checking often and throughout the process, you are able to find and address issues early on, saving considerable time and money.

Cost Factors Affecting Manufacturing QA

The cost of manufacturing quality control is affected by the scale of your order and the acceptable quality limit (AQL) you’ve chosen for your product. Learn more about acceptable quality limits at this article by QualityInspection.org.

Bonus: The Cost of Shipping

Although this article is focused on the product development costs, we will leave this here as an honorable mention as it is a significant cost. (Please note, this list also excludes the cost of the factory production order itself).

[Estimate: $1,500 – $25,000 (pre-pandemic to mid-pandemic for a 40’ container – China to North America)]

After production, it is important to ensure that your product gets to its destination safely.  There are different ways to transport your product – if manufacturing in China, the two options are sea freight or air freight. Although this is the major differentiator, this stage refers to transportation from factory to fulfillment center. 

This includes trucking from factory to port, export management, import management, trucking from port to train station, train transport, and trucking from train to fulfillment center. This is commonly referred to logistics, because there are many moving parts that need to be coordinated to execute this efficiently.

Factors Affecting the Costs of Shipping and Logistics

Air freight is a good option for small, low weight, high value products or when time is critical, but we will focus on sea freight as that is the more common path. The quantity of your order will determine the size and number of shipping containers you will use, but there are many nuances to this cost. 

  • The size of your package determines how many units will fit in a container and the corresponding cost/unit.
  • Location of factory with respect to the port
  • Palletizing your product (fit less product, pay for pallets, pay for forklift)
  • Not palletizing your product (fit more product, pay more for manual loading and unloading, unloading delays and storage)
  • Whether your shipping route is well travelled (lower cost, higher chance of delays)
  • The type of product you are shipping (export and import duties)
  • Additional shipping services like tracking and insurance

Estimate the cost of your freight with this FreightOS calculator

Estimate the cost of import duties with this FreightOS calculator.

When diving deep, don’t trust the calculator, look for yourself using this US government database

Conclusion

As you now know, product development is a complex process that is different for every project.

There are many steps and costs associated with the product development process. A ball park range for consumer products made for mass manufacture is $75,000 – $100,000 for professional, relatively simple product designs, plus extra for production and logistics.

However, these projects can quickly run over budget because from design issues, scope creep, and improper planning. Product development requires a great deal of communication and timeline management which is why full service product design firms are so convenient.

If you want to know more about product development and how to bring your product from concept to market, learn more about The Ventrify Design Process Here or check out our other insights.

About the Author

Ventrify is a product design and manufacturing firm that helps entrepreneurs bring product ideas from concept to market. We take in fledgling ideas and bring them through our iterative design process to create products our clients can be proud of. Then, we work with manufacturing facilities worldwide to bring our clients the highest quality products at competitive prices.

If you have questions about estimating the cost of your product development or need help, reach out to us through our Website, Facebook, or LinkedIn.